Learning the IIIF Presentation Api
Reflections on the Common Needs of an Image Viewer
Exercise
In this exercise, we want to build an organic bridge from the IIIF image API to the need for something like the IIIF presentation API.
To get a feel for the need for this second API, I want us to think about ourselves as web application designers.
If we wanted to build a photo gallery or image viewer for all the images we've now made available via the IIIF Image server, how would you do it? What information would you need?
There are two ways we can do this, depending on your comfort level.
Method 1.
Start making a simple website where you can insert images
Navigate to our WorkshopDir using our alias $ workshop or with your full path, e.g. $ cd ~/Your/Path/To/WorkshopDir
Create a new directory called myImageViewer
Inside of myImagerViewer make an index.html file (make other files as needed, e.g. image1.html, image2.html, etc)
Open that index.html file in your browser.
Or serve using http-server/ live-server (requires node.js, see pre-reqs page)
or
Method 2.
Get out a piece of paper and pen and begin storyboarding your application.
In either, case create an index.html page that has a list of your images.
Then create a display page for each image, with titles, captions, thumbnails, whatever you can think of.
** Tips **
You can images to an html page with the <img src="http://url/to/your/image/goes/here>"/>
Try using the IIIF image coordinates parameter to display different parts of your image.
You can try this cropper tool to select regions of your images https://jbhoward-dublin.github.io/IIIF-imageManipulation/index.html?imageID=http://127.0.0.1:8182/iiif/2/demo.jpg
Reflections
As you proceed, I'd like you to consider the following questions:
What classes of information (other than images) did you find yourself in need of in order for you to get your application to work?
What classes of relationships between classes of information did your application require?
The IIIF Presentation API emerged out of a recognition that many image presentation applications need common classes of information and depend on common classes of relationships.
But often this information is intertwined with the presentation logic of the application itself. Making it very difficult to re-use and application.
But what if we could separate that data from the application.
- This would allow us to swap data in and out from the same application.
- This would allows us to swap viewers in and out for the same data.
IIIF Presentation API Overview
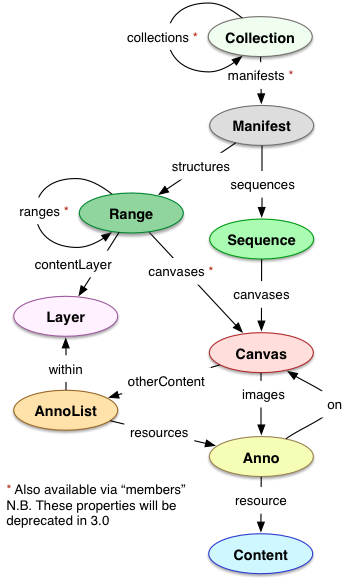
The basic object types of a IIIF 2.x manifest


A common question: Why do we need a Canvas? Why isn't the image enough?
We need the canvas abstraction, because there are many use cases where we might want to swap images in and out, while retaining the ability to associate annotations with the same coordinate space.
See for example http://projectmirador.org/demo/advanced_features.html (check out the layers tab!)
Creating a Manifest
Method 1 (Bodleian manifest editor)
Let's create our first manifest with the https://iiif.bodleian.ox.ac.uk/manifest-editor/
After you've finished create the manifest, let's save it.
Navigate to our WorkshopDir using our alias $ workshop or with your full path, e.g. $ cd ~/Your/Path/To/WorkshopDir
Create a new directory called manifests
$ mkdir manifests
Export your manifest from the Bodleian manifest editor and save it in your "manifests"
Method 2 (create a script)
Once the basic anatomy of IIIF manifest is understood, most everyone will want to script/automate the creation of their manifest. (No one wants to type hundreds of repetitive lines by hand.)
This ruby script is an example of such automation. https://gist.github.com/jeffreycwitt/c3898946158ffdfff2d1c43f11666517
To run, you need ruby installed and imagemagik (but this latter dependency can be circumvented by changing lines 53 and 57).
It loops through a directory of images and will create a manifest for all the images in that directory.
Let's serve your manifest
Let's serve your manifest
Method 1 (myjson)
Method 2 (gist)
Method 3 (live-server)
(Requires Node.js and http-server or live-server, see pre-reqs page)
Navigate to your "manifests" folders
live-server --cors
View Your Manifest
Viewing Online in UniversalViewer
Copy that URL, navigate to http://universalviewer.io/uv.html?manifest= and past the hosted manifest url after the = in the url.
Hopefully you will see your images in the UniversalViewer.
Viewing Online in Mirador
Let's also view this in Mirador
Navigate to http://projectmirador.org/demo/.
Click the x box in both windows to close the windows.
Hover over the icon to the right of the x and click "Replace Object"
Paste in your manifest url to the text box "Add new object from URL:"
Click "Load" - You should see your manifest loaded there. Click on one of your images. You should see one of your images now in the viewer.
Installing and configuring Mirador Locally
Download the most recent release from here: https://github.com/ProjectMirador/mirador/releases/tag/v2.7.0
Unzip the package
Move the unzipped package into your WorkshopDir
In Chrome open the file in the downloaded package called example.html
File->Open File->example.html
Now drop in your custom manifest